Search for content here...
    

PRACTICAL SUTURE TECHNIQUES

Module2_17
Inverted suture
Module2_18
mattress suture Module2_19
Horizontal mattress suture
Module2_20
Subcuticular suture Module2_21
Retention suture

SUTURE TECHNIQUES

  • Aim of all suturing techniques: approximate wound edges without gaps or tension
  • Size of suture “bite” and interval between bites should be equal in length, proportional to thickness of tissue being approximated
  • Suture is foreign body: use minimal size, amount of suture necessary to close wound

SUTURE MATERIALS

Sutures are made of variety of materials with variety of properties

  • Non-absorbable
    • Use when possible
    • Braided suture not ideal for contaminated wounds
    • May sterilize polyester thread or nylon line when commercial suture unavailable
  • Absorbable
    • Degrades, loses tensile strength within 60 days
    • Option when not possible for patient to return or for children for whom suture removal may be difficult

SUTURE TECHNIQUES

  • Use tip of needle driver to hold needle between half - two thirds way along needle
  • Hold needle driver so that fingers are just within rings so possible to rotate wrist
  • Pass needle tip through skin at 90o
  • Use curve of needle by turning needle through tissue
  • Close deep wounds in layers with either absorbable or monofilament non-absorbable sutures
Module2_22
Inverted suture


Interrupted sutures

  • Most commonly used to repair lacerations
  • Permits good eversion of wound edges
  • Use only when minimal skin tension
  • Ensure bites are equal volume
  • If wound edge is unequal, bring thicker side to meet thinner side to avoid putting extra tension on thinner side
  • Use non-absorbable suture, if possible
Module2_23

Continuous/running sutures

  • Less time-consuming than interrupted sutures;
  • Fewer knots tied
  • Less suture material used
  • Less precise in approximating wound edges
  • Poorer cosmetic result than other options
  • Epidermal skin cells growing into wound (inclusion cyst) or along suture track are potential complications

Continuous subcuticular sutures

  • Excellent cosmetic result
  • Use fine, absorbable braided or monofilament suture
  • Does not require removal if absorbable sutures used
  • Useful in wounds with strong skin tension, especially patients prone to keloid formation
  • Anchor suture in wound; from apex, take bites below dermal-epidermal border
  • Start next stitch directly opposite preceding one
Module2_24
Subcuticular suture

Mattress sutures

  • Provides relief of wound tension
  • Provides precise wound edge apposition
  • More complex, therefore more time-consuming
  • Vertical and horizontal types

Module2_25

Purse string suture

  • Circular pattern that draws together     tissue in path of suture
  • Used particularly around drain sites
  • Generally non-absorbable suture
Module2_26

RETENTION SUTURE TECHNIQUES

Module2_27 Module2_28 Module2_29

Insert retention sutures through entire thickness of abdominal wall leaving them untied (A)
Simple or mattress sutures
Close wound in layers (B)
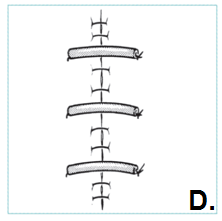
When skin closure completed, tie each retention suture after threading through short length plastic or rubber tubing (C, D)
Do not tie retention sutures under tension
Leave sutures in minimum 14 days; may be left for weeks

Module2_30
© Copyright 2024 WHO