Musculoskeletal Trauma
LIMB INJURY
Examination must include:
- Skin colour, temperature
- Distal pulse assessment
- Bleeding sites
- Alignment, deformities
- Active, passive movements
- Level of pain caused by injury
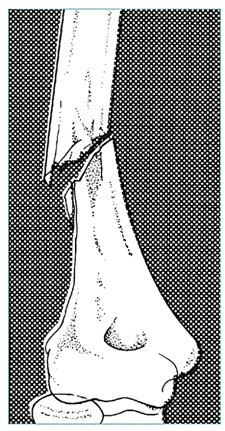
OPEN FRACTURES
- Open or compound fractures: injuries involving both bone, soft tissue, open skin
- All contaminated; primary closure is contraindicated
- Predisposes to anaerobic infection, chronic osteomyelitis
- Treatment:
- aggressive wash-out, debridement, immobilization
- Perform debridement within 6 hours;
- If indicated, do not delay referral
- Remove small free bone fragments without obvious blood supply
- Do not strip muscle, periosteum from fractured bone
- Leave vessels, nerves, tendons intact
- Pack wound
- Stabilize fracture after wound debridement; perform definitive fracture treatment later
- Stabilize with a well-padded posterior plaster slab or complete plaster cast split to prevent compartment syndrome
CASTS AND SPLINTS
- Provide immobilization of extremities and spine following injuries, other abnormalities of bone, soft tissues
- Use plaster or fibreglass to construct casts, splints
- Fibreglass is lighter, resists water, but more expensive and more difficult to remove
- Wood, cardboard can serve as temporary splints
- Use splint for acute injuries to allow room for swelling
- Casts are wrapped circumferentially around extremity; they provide more rigid fixation than splints
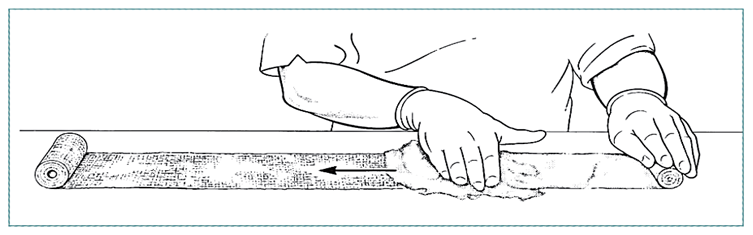
To prepare plaster of Paris bandage, use dry cotton gauze (muslin) bandage 500 cm long and 15 cm wide. Unroll a portion on a dry table and apply plaster powder evenly to the surface.
Gently, but firmly, rub the powder into the mesh of the cotton and carefully roll up the powdered portion. The bandage may be stored for later use.
CAST APPLICATION
 |
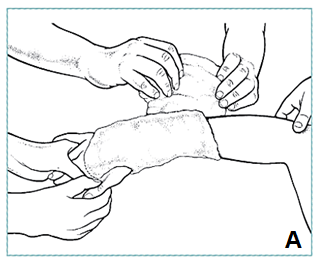
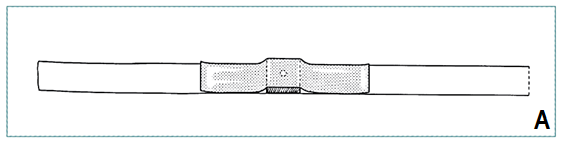
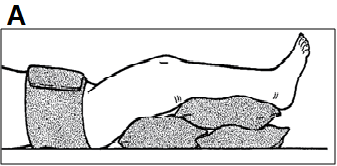
- Cleanse skin, apply stockinet; avoid wrinkles
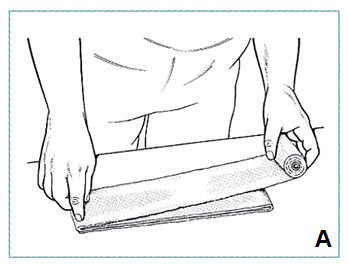
- Apply layer cotton padding over stockinet, extra padding over bony prominences (A)
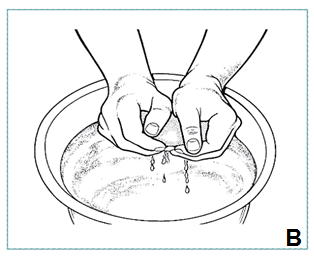
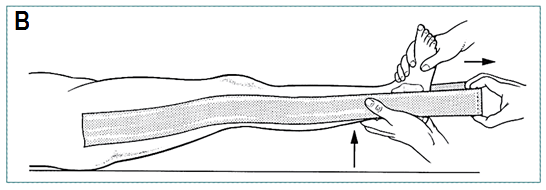
- Soak plaster roll in water at room temperature; leave in water until completely soaked, air bubbles cease to rise
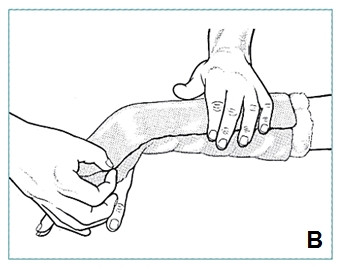
- Gently pick up ends of bandage with both hands, lightly squeeze, pushing ends together without twisting, wringing (B)
|
CASTS AND SPLINTS
 |
- While applying plaster, hold relevant body part in correct position; movement causes ridges on inside of plaster
- Work rapidly, without interruption, rubbing each layer with the palm so that the plaster forms homogenous mass rather than separate layers
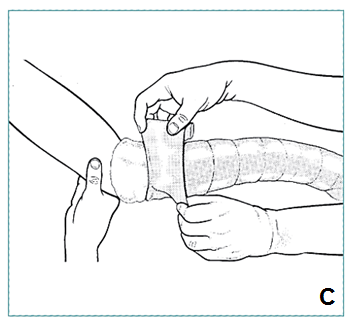
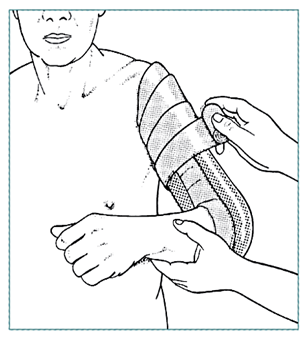
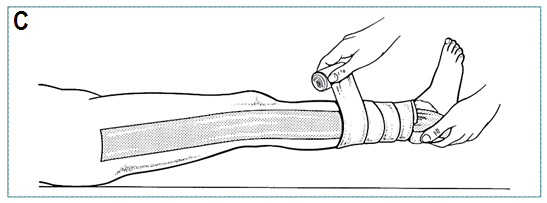
- Apply plaster by unrolling bandage as it rests on limb, do not lift it up from the patient or apply tension to roll
- Overlap previous layer by about half width of roll (C)
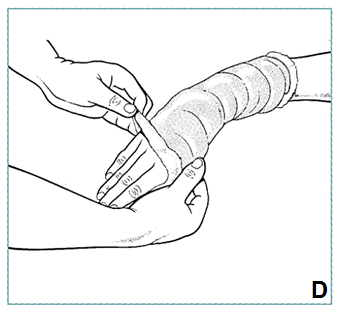
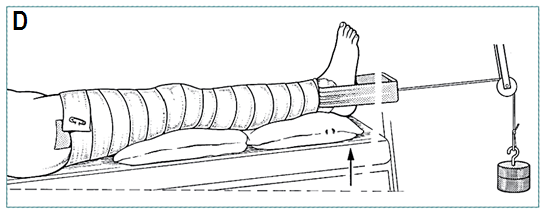
- Mould plaster evenly around bony prominences, contours, leaving 3cm padding at upper and lower margins of cast to protect skin; fold over, incorporated in last plaster layer (D)
- Mould cast until plaster sets, becomes firm; completely sets in 24 hours
- Technique for fibreglass is similar, but fibreglass is slightly elastic, will contour to limb more easily; sets firmly in 30 minutes
|
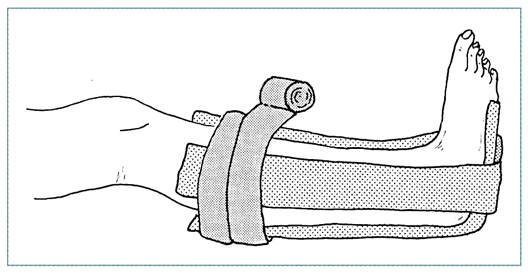
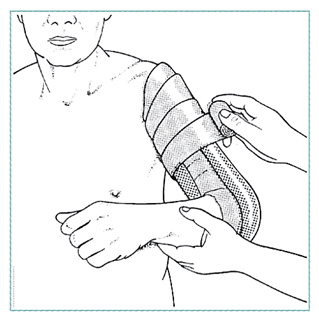
SPLINT APPLICATION
 |
- Measure length of material needed to secure limb
- Place 3-5 layers of padding on flat surface, unroll 5-10 layers plaster onto padding (A)
- Grasp plaster layer at each end, dip in water, gently squeeze together without twisting
- Place on padding, smooth with the palm into homogenous layer
- Place splint on limb, padding side towards the patient, mould it to limb contours
- Secure with elastic bandage or gauze wrap (B)
|
Patient instructions
- Give oral and written instructions to the patient and/or to accompanying relatives, others
- Give instructions in non-technical language that the patient, family can easily understand
- Give opportunity for questions
splints and casts
- Keep the cast or splint dry at all times
- Do not try to scratch your skin under the cast or splint with a sharp or blunt object
- Allow the cast to dry for 24 hours before putting weight on it or resting it on a hard surface
- For acute injuries, elevate the injured part for 1-2 days and wiggle your fingers or toes frequently
- Return to the health clinic immediately if:
- Your cast or splint gets wet or becomes soft or broken
- You have increasing pain
- You experience numbness or tingling, or have difficulty moving your fingers or toes
- You see a change in skin colour of the extremity with the cast
- Your cast or splint has a foul odour
TYPICAL SPLINTS
 |
 |
| Sugar tong splint |
3-way ankle splint |
TYPICAL CASTS
REMOVING A CAST�WITH PLASTER SHEARS
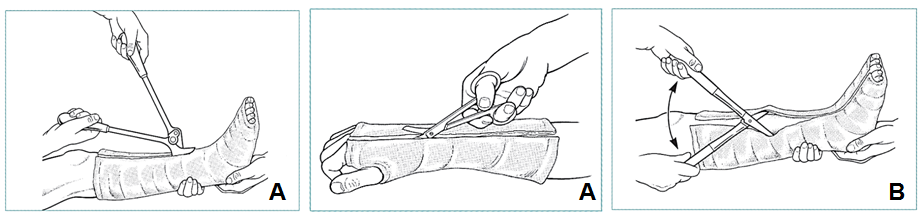 |
- Make 2 cuts along opposing surfaces of cast (A), avoiding bony prominences
- Begin cutting at an edge, then loosen cast with plaster spreader (B)
- Complete division of plaster and padding with plaster scissors, be very careful not to injure underlying skin
- Under difficult conditions, or if a child, soften plaster by soaking in water (or water and vinegar) for 10-15 minutes, then unroll like a bandage
|
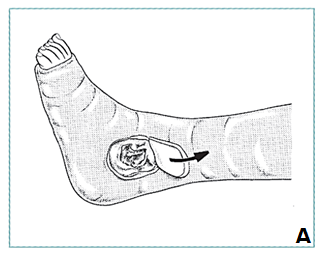
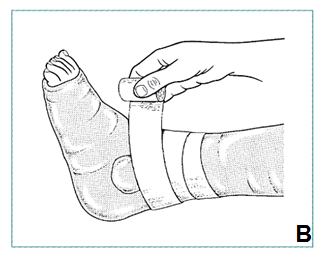
COMPLICATIONS: Pressure Sores
 |
Location
- Ankle (malleolus)
- Dorsum of foot
- Distal ulna at wrist
Treatment
- Put on new cast or cut window in plaster at suspected site (A)
- Clean wound, treat with dressing changes
- Fill hole in cast with padding
- Hold plaster in place with firm bandage (B)
|
COMPLICATIONS
Skin blistering
- Skin under plaster becomes dry, scaly
- Rarely, skin allergy to plaster or fibreglass
- Staphylococcal infection of hair follicles and sweat glands can lead to severe painful, purulent dermatitis
- Can be treated with antihistamines, systemic antibiotics, limb elevation; should respond within 2 days
- If severe, find another way to treat fracture
TRACTION
- Weight applied through traction system counteracts muscle force pulling across fracture, keeping bone in proper alignment, length
- Use appropriate method of traction to treat fractures of extremities
- Apply extremity traction to skin distal to fracture
- Do not apply traction to skin with:
- Abrasions, lacerations
- Surgical wounds
- Ulcers
- Loss of sensation
- Peripheral vascular disease
SKIN TRACTION
- Clean limb with soap and water, then dry
- Measure appropriate length of adhesive strapping, place on level surface, adhesive side up
- Place 7.5 cm square wooden spreader with central hole in the middle of the strapping (A)
- Apply strapping to medial and lateral sides of limb, allowing spreader to project 15 cm below sole of foot (B)
- Gently elevate limb off bed while applying longitudinal traction (C)
- Apply traction (D)
|
 |
SKIN TRACTION: COMPLICATIONS
- Allergic reactions to adhesive material
- Blister formation, pressure sores from slipping straps
- Compartment syndrome from over-tight wrap
- Peroneal nerve palsy from tight wraps around knee
- Joint stiffness prevented by active, active-assisted exercise
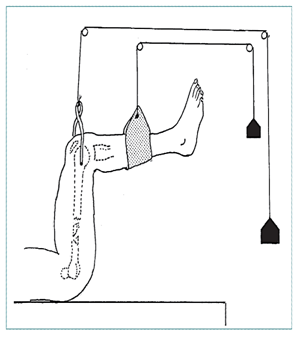
EXTREMITY TRACTION
 |
 |
 |
| Skin traction: forearm fracture |
Skin traction (suspension traction) |
90/90 balance suspension |
UPPER EXTREMITY INJURIES
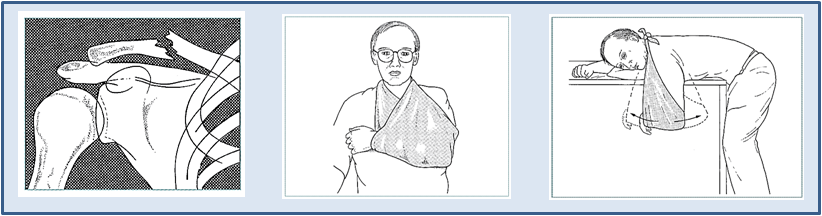
Clavicle Fractures
Diagnose from history and physical examination Treat with sling for comfort Release to allow elbow extension and hanging arm exercises.
|
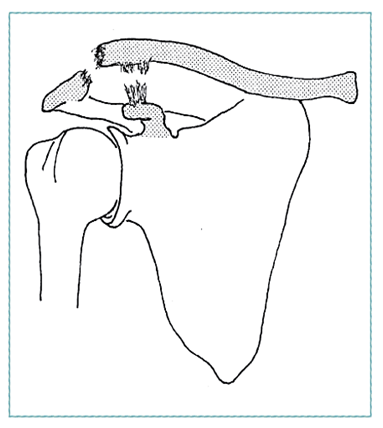
Acromial-clavicular Joint Separation
Separation of acromial-clavicular joint results from falls on the tip of the shoulder
Make diagnosis based on history, physical examination
Treat with arm sling When comfortable, begin range of motion, active muscle strengthening in shoulder
|
 |
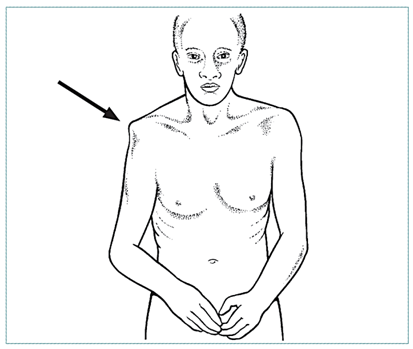
SHOULDER DISLOCATION
 |
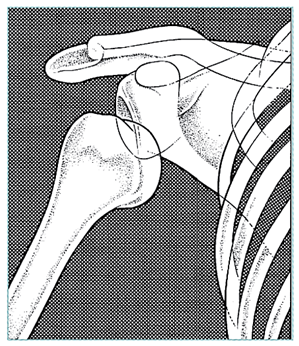 |
| Hollow area in place of humeral head (arrow) |
X-ray to determine if there is fracture |
Shoulder Dislocation
- Make diagnosis by physical examination
- X-ray if significant trauma to exclude fracture
- Neurological exam, look for peripheral nerve or brachial plexus injury
- Treat with closed manipulation (next slide)
- X-rays to evaluate reduction
- Recurrent dislocations are common, especially in younger patients
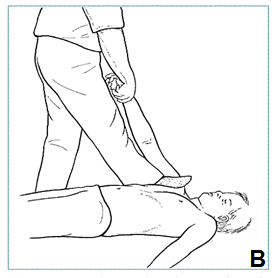 |
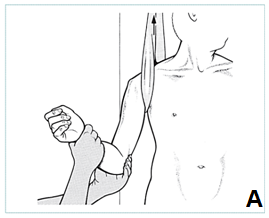
Patient supine
If assisted
- he/she should place sheet under axilla for counter traction
- pull slowly, steadily on flexed elbow (A)
If alone
- place foot in axilla for counter traction
- gently pull on arm (B)
|
|
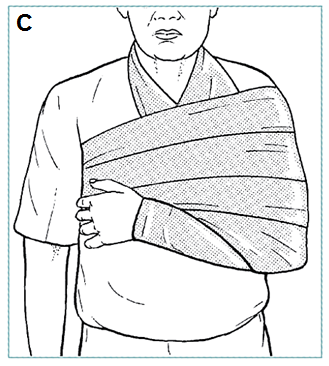
After reduction, place arm in sling;
swath to prevent abduction, external rotation (C)
Begin strengthening exercises at 6 weeks, with emphasis on internal rotation strength
|
 |
HUMERAL SHAFT FRACTURES
 |
- Humeral shaft fractures result from direct trauma or rotation of arm
- Closed reduction, coaptation splint
- Most significant complications are radial nerve injury (15%) and non-union
|

Path of radial nerve passing around humerus
|
HUMERAL SHAFT FRACTURES�TREATMENT
 |
 |
| Coaptation splint |
Splint for radial nerve palsy |
THE HAND: Fractures and Dislocations
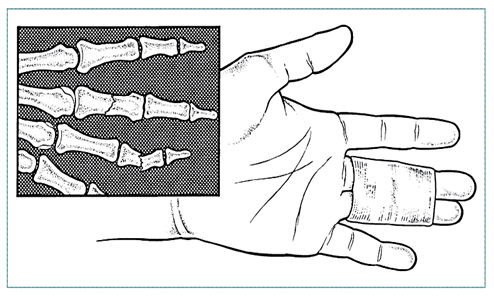
Phalangeal fractures
- Treat non-displaced, stable fractures by taping to adjacent uninjured digit—"buddy tape"—or with a simple dorsal splint
FRACTURES OF THE PELVIS AND HIP
Pelvic Ring Fractures
- Pelvic ring fractures result from high-energy trauma
- Classified as stable or unstable
- Unstable fractures associated with significant blood loss, multiple system injury
- Treat initially with systemic resuscitation, temporary pelvic compression
FRACTURES OF THE PELVIS AND HIP�Pelvic Ring Fractures
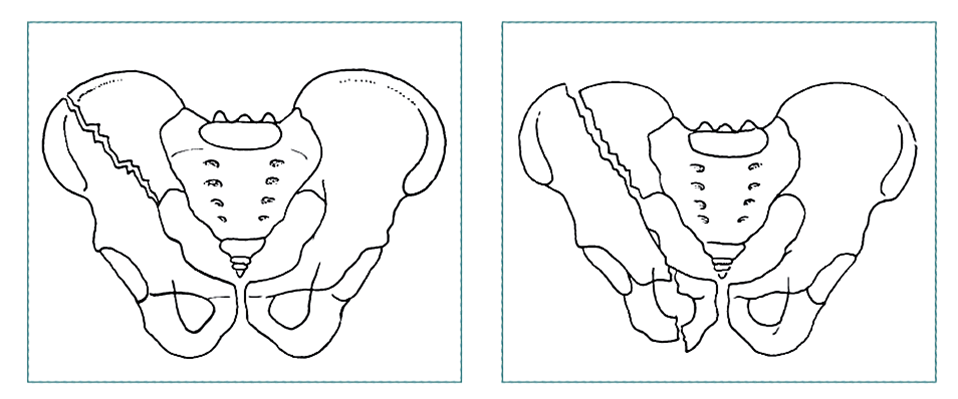 |
| Stable fracture with single fracture component |
Unstable pattern: fracture at 2 or more sites, or those with disruption of symphysis pubis or sacroiliac articulation |
Evaluation
- Flank ecchymosis
- Labial or scrotal swelling
- Abnormal position of lower extremities
- Pain with pelvic rim compression
Treatment
- Focus initially on general resuscitation efforts
- Stable fractures—bed rest and analgesics; rarely significant blood loss
FRACTURES OF THE PELVIS AND HIP�Unstable Pelvic Ring Fractures
 |
Assessment
- Result of high impact blunt injury
- Associated with visceral damage, significant bleeding
Treatment as emergency procedure
- Place compression on greater trochanters using sheet or sling to close pelvic space, tamponade active bleeding (A)
- Treat with pelvic sling and/or traction on leg to reduce vertical shear component of fracture (B)
- Maintain traction until fracture is consolidated—usually 8-12 weeks
|
COMPARTMENT SYNDROME
Diagnostic findings
- Pain out of proportion to injury
- Tense muscle compartments to palpation - Pain with passive stretch of involved muscle
- Decreased sensation
- Weakness of involved muscle
- Pallor or decreased capillary refill (late finding)
- Elevated compartmental pressures (if measurable)
Treat with immediate surgical release of skin and fascia
COMPARTMENT SYNDROME: Leg
COMPARTMENT SYNDROME: Forearm
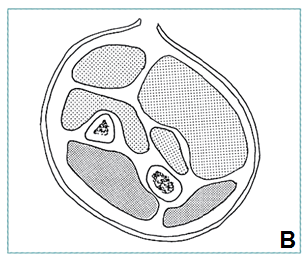 |
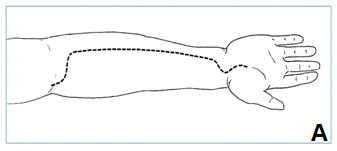
Technique
- Decompress superficial and deep volar compartments through single incision (A, B)
- Divide superficial fascia for entire length, open carpal tunnel
- Inspect muscles for necrosis; remove obviously dead muscle—if in doubt, leave it
- Do not close wound
- Apply sterile dressing; splint wound
|
FRACTURES IN CHILDREN
- Open growth plates, thick periosteal membrane make fractures in children different from those in adults
- Treat fractures by closed reduction; certain displaced epiphyseal fractures may need surgical reduction
- Future growth will remodel some residual deformity in length, angulation, displacement but not rotation
INCOMPLETE FRACTURES IN CHILDREN
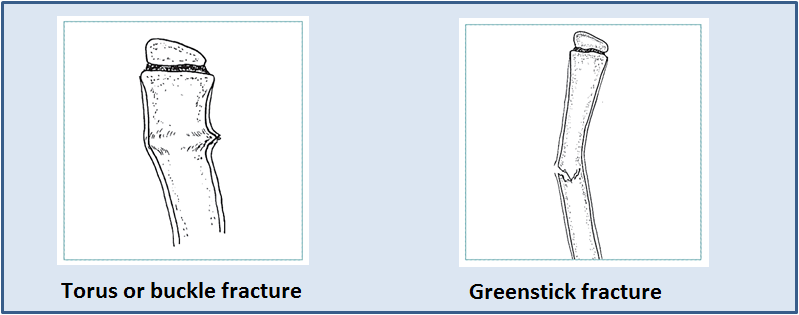
- Growth in length occurs through cartilaginous epiphyseal plates; growth in width through periosteal membrane
- The periosteal membrane is a thick fibrous layer that covers bone, provides stability to torus and greenstick fractures
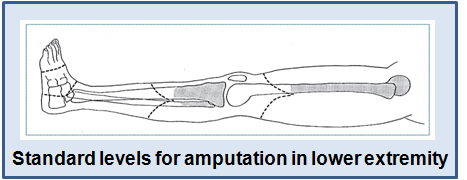
AMPUTATIONS
|
Evaluate skin, muscle, vascular supply, nerve function and bone integrity Mangled but intact extremity following trauma requires careful consideration
Indications for amputation:
- Malignant tumour
- Severe infections
- End-stage arterial disease
- Irreparable trauma to extremity
- Loss of vascular supply and sensation
- Severe damage to three of five major tissues (artery, nerve, skin, muscle, bone) = indication for early amputation
|
 |